|
|
|---|


Thursday, September 2, 2010
September Lookbook
Browse our September Lookbook by clicking on it to enlarge (if you wish). We love this month's collection dubbed "Mixed Tape", a compilation of everything from papergoods to neato halloween costumes! The lookbook is also interactive so you can click on each item's description and go directly to each vendor's online table at our market. And for those of you new to visiting our "curated market, if you're interested in buying an item you see, click on the item, which will take you directly to each vendor's online shop! Stay tuned for our announcement of our first "Mixed Tape" giveaway winner!

DIY: Crafty Book Binding by Janis Nicolay
Hello all! Janis here, from Pinecone Camp. I'd like to share a simple, and fun, crafty project with you. It's a good one to do with kids, though you may want to handle the awl or it could be hazardous. Ouch.
I used to shoot weddings, and my partner and I would also make the albums for our clients. We used the "stab-stitch" method. I've since picked up a book called "How To Make Books" by Esther K. Smith, to pick up some other methods. My niece wanted to make some books to give her friends when she goes back to school, so I chose a simple stitch and gathered up some bits of paper and cardboard that I had laying around. Here we go...
 The materials used for this little book. Everyone seems to have left-over bits of paper, so rather than toss out, make a book!
 Tools used for this project. A paper punch (to create circles), needle, awl, bone folder, bulldog clips, exacto blade, scissors, and a ruler.
 Cut and fold paper and cardboard to the size you want the book to be. Burnish the folds with a bone folder.
 After scoring the back side of both the front and back covers (about 3/4" from side), clip all pages and covers with bulldog clips. Use some paper to pad the bulldog clips to prevent dents in cardboard.
 For a 5"x7" book punch three holes with the awl: one in the centre and one on each end about 1" in.
 Using book binding thread or a sturdy cord or ribbon, start stitching. I used a stitch very similar to what I did with wedding albums. It's pretty easy, but you really can come up with many different patterns. Try it out!

Cut out shapes with your scrap paper. We made some simple birds and circles. Glue stick was used to attach cut-outs to cover.
 My niece wanted a place for "secret messages and stickers", so I made an envelope for the inside back cover. Every girl should have a safe place for secret messages and stickers!
 You can do so much with a few bits of scrap paper and some book binding tools. Have fun!
All images by Janis Nicolay at Pinecone Camp.
I used to shoot weddings, and my partner and I would also make the albums for our clients. We used the "stab-stitch" method. I've since picked up a book called "How To Make Books" by Esther K. Smith, to pick up some other methods. My niece wanted to make some books to give her friends when she goes back to school, so I chose a simple stitch and gathered up some bits of paper and cardboard that I had laying around. Here we go...
The materials used for this little book. Everyone seems to have left-over bits of paper, so rather than toss out, make a book!Tools used for this project. A paper punch (to create circles), needle, awl, bone folder, bulldog clips, exacto blade, scissors, and a ruler.Cut and fold paper and cardboard to the size you want the book to be. Burnish the folds with a bone folder.After scoring the back side of both the front and back covers (about 3/4" from side), clip all pages and covers with bulldog clips. Use some paper to pad the bulldog clips to prevent dents in cardboard.For a 5"x7" book punch three holes with the awl: one in the centre and one on each end about 1" in.Using book binding thread or a sturdy cord or ribbon, start stitching. I used a stitch very similar to what I did with wedding albums. It's pretty easy, but you really can come up with many different patterns. Try it out!Cut out shapes with your scrap paper. We made some simple birds and circles. Glue stick was used to attach cut-outs to cover.
My niece wanted a place for "secret messages and stickers", so I made an envelope for the inside back cover. Every girl should have a safe place for secret messages and stickers!You can do so much with a few bits of scrap paper and some book binding tools. Have fun!All images by Janis Nicolay at Pinecone Camp.
New Peek-a-boo Naturals Collection from Smidgebox

Lesley of Smidgebox out of Vancouver is launching a new collection in her shop today, the first phase of her peek-a-boo naturals collection.
Consisting of fabric bins in three different sizes, mini + medium + large. They're great for storage all over, from office to children's rooms. This is the first time Lesley is incorporating linen into her work, adding a rustic and simple textile mixed with the modern + bright designs she is well known for. Later in the fall, she'll be introducing some throw pillow covers, as well as a small line of stockings for Christmas time!
smidgebox.etsy.com
Smidgebox is also in our market this month here!
Wednesday, September 1, 2010
Free Downloadable Wallpaper

To celebrate the 250th birthday of Toile du Jouy, Visi teamed up with Wendren from thewren and together they are offering two of her hand drawn Toile du Jouy fabric designs as free downloads. As Wendren mentions on her blog, "The design is a half drop repeat which means that once you have downloaded it you can repeat it till your heart is content and if you want, fill a whole wall with the design". Download ‘Darling Toile’ for free on VISI.co.za by clicking here. (Via Bloesem).
Introducing your new best friend: The Swedish Visiting Cake
By Jeannette Ordas of Everybody likes Sandwiches
 Everyone needs a quick cake recipe that's easy to whip up, tastes like love and doesn't come from a box mix. Last summer I discovered the Easiest Cake Ever and now, I've found another fabulous cake recipe that's a cinch – and delicious to boot!
 Let me introduce you to the Swedish Visiting Cake. What sounds more like sweetness on a plate than that? This cake comes from baking guru Dorie Greenspan and it's a perfectly simple quick & easy cake. Yet more importantly, this cake is buttery and fragrant and will fill your kitchen with the heady scent of almonds, lemons and vanilla. The edges of the cake are crisp, the almonds on top provide crunch, while the crumb is moist and deliciously dense. It's an instant crowd pleaser and your guests will love you for it.

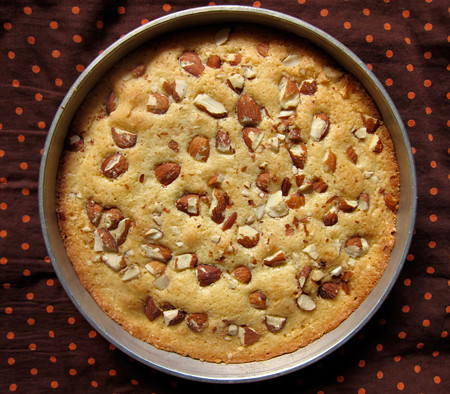 Everyone needs a quick cake recipe that's easy to whip up, tastes like love and doesn't come from a box mix. Last summer I discovered the Easiest Cake Ever and now, I've found another fabulous cake recipe that's a cinch – and delicious to boot!
 Let me introduce you to the Swedish Visiting Cake. What sounds more like sweetness on a plate than that? This cake comes from baking guru Dorie Greenspan and it's a perfectly simple quick & easy cake. Yet more importantly, this cake is buttery and fragrant and will fill your kitchen with the heady scent of almonds, lemons and vanilla. The edges of the cake are crisp, the almonds on top provide crunch, while the crumb is moist and deliciously dense. It's an instant crowd pleaser and your guests will love you for it.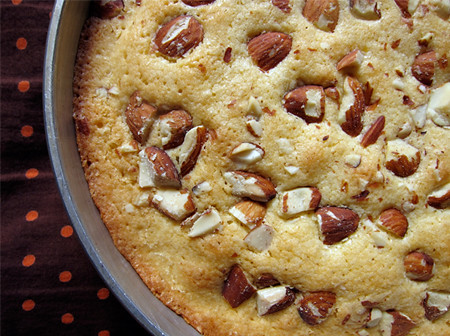
Swedish Visiting Cake
(adapted from Dorie Greenspan's cookbook "Baking, From My Home to Yours")
3/4 cup + 1 tablespoon sugar
zest from 1 lemon
2 large eggs
1/4 teaspoon salt
1 teaspoon pure vanilla extract
1/2 teaspoon pure almond extract
1 cup all-purpose flour
1/2 cup unsalted butter, melted and cooled
About 1/4 cup almonds (sliced or roughly chopped)
Preheat oven to 350F. Butter a 9 inch cake pan.
In a large bowl, blend together sugar and lemon until the sugar is lemony-fragrant. Whisk in eggs until well blended. Stir in salt and extracts. Add in flour and blend lightly with a wooden spoon or rubber spatula. Fold in melted butter.
Pour batter into pan and scatter almonds over top. Bake the cake for 25-30 minutes or until the cake is golden and the edges get a little crisp. Cool on a wire rack and use a knife to loosen cake from the sides of the pan. Serve warm or cool.
(adapted from Dorie Greenspan's cookbook "Baking, From My Home to Yours")
3/4 cup + 1 tablespoon sugar
zest from 1 lemon
2 large eggs
1/4 teaspoon salt
1 teaspoon pure vanilla extract
1/2 teaspoon pure almond extract
1 cup all-purpose flour
1/2 cup unsalted butter, melted and cooled
About 1/4 cup almonds (sliced or roughly chopped)
Preheat oven to 350F. Butter a 9 inch cake pan.
In a large bowl, blend together sugar and lemon until the sugar is lemony-fragrant. Whisk in eggs until well blended. Stir in salt and extracts. Add in flour and blend lightly with a wooden spoon or rubber spatula. Fold in melted butter.
Pour batter into pan and scatter almonds over top. Bake the cake for 25-30 minutes or until the cake is golden and the edges get a little crisp. Cool on a wire rack and use a knife to loosen cake from the sides of the pan. Serve warm or cool.


From Montreal: Emeline & Annabelle
Guest Post by Amy Johnson & Marilis Cardinal of Puces POP

Montreal finally has a beautiful sewing lounge like The Workroom in Toronto or New York's Purl Soho. Emeline & Annabelle opened shop in Montreal's west-end NDG neighbourhood in April of this year and things have really taken off for them.
The thing that is so wonderful about Emeline & Annabelle is how tidy and organized the whole space is. As soon as you walk into the workshop you want to grab some beautiful bolts of Amy Butler fabric from the wall and get right to work. With windows all along the whole corner shop there's a bright, light feeling that makes you instantly inspired and gets the creative juices flowing.
With plenty of workshops offered every month and rent-by-the-hour studio space there's no longer an excuse for not knowing how to sew in Montreal. Check out their schedules if you're in the Montreal area.


Guest Post by Amy Johnson & Marilis Cardinal of Puces POP
Puces Pop Craft Fair
POP Montreal International Music Festival
Celebrating 9 Years of POP Montreal,
September 29th - October 3rd, 2010
Montreal finally has a beautiful sewing lounge like The Workroom in Toronto or New York's Purl Soho. Emeline & Annabelle opened shop in Montreal's west-end NDG neighbourhood in April of this year and things have really taken off for them.
The thing that is so wonderful about Emeline & Annabelle is how tidy and organized the whole space is. As soon as you walk into the workshop you want to grab some beautiful bolts of Amy Butler fabric from the wall and get right to work. With windows all along the whole corner shop there's a bright, light feeling that makes you instantly inspired and gets the creative juices flowing.
With plenty of workshops offered every month and rent-by-the-hour studio space there's no longer an excuse for not knowing how to sew in Montreal. Check out their schedules if you're in the Montreal area.
Guest Post by Amy Johnson & Marilis Cardinal of Puces POP
Puces Pop Craft Fair
POP Montreal International Music Festival
Celebrating 9 Years of POP Montreal,
September 29th - October 3rd, 2010
Subscribe to:
Posts (Atom)


